RFP LAB:Purpose: The purpose of this lab was to express the Red Fluorescent Protein (RFP), originally found in jellyfish, in E. Coli bacteria. In doing so, we learned all the steps of genetic engineering and were given the lab opportunity to complete the experiment hands-on.
Amp: resistant to ampicillin, an antibiotic
- acts as selection marker for recombinant bacteria
Ara-C: binds to the promoter of the RFP gene
- responsible for gene expression of RFP
RFP: red fluorescent protein, the desired trait that the plasmid uptakes
Materials & Procedure:
Lab 2A - materials and procedure can be found in Amgen lab manual 2a
Lab 4A - materials and procedure can be found in Amgen lab manual 4a
Lab 6A - materials and procedure can be found in Amgen lab manual 6a
Lab 4A: Verification of Plasmid Digest by Electrophoresis
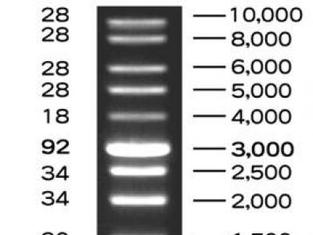
To ensure that we had actually cut the plasmid correctly, we used the process of electrophoresis. This means that we ran the plasmid in a gel alongside a DNA ladder. A DNA ladder has different-sized molecules already programmed into it, so after being run, it provides a "ladder" of bands that can be corresponded with the other lanes in order to decipher their molecule sizes. Because we already knew the size of the RFP gene and the plasmid, we were able to say if the digest had gone smoothly.
Experimental Overview:
Lab 2A: Verification of Plasmid by Restriction Digest
In this part of the lab, we cut a plasmid (a circular piece of DNA) with BamH1 and HindIII. In doing so, we were able to extract the segment of the RFP-Ara gene.
Lab 4A: Verification of Plasmid Digest by Electrophoresis
To ensure that we had actually cut the plasmid correctly, we used the process of electrophoresis. This means that we ran the plasmid in a gel alongside a DNA ladder. A DNA ladder has different-sized molecules already programmed into it, so after being run, it provides a "ladder" of bands that can be corresponded with the other lanes in order to decipher their molecule sizes. Because we already knew the size of the RFP gene and the plasmid, we were able to say if the digest had gone smoothly.
Lab 5A: Transformation of Bacteria with Recombinant Plasmid
The heart of the RFP lab was in this section, where we transformed the bacteria into a recombinant (man-made) plasmid. We used restriction enzymes to cut the plasmid and ligase to paste the gene of interest. We then used a selective marker (Amp-R, resistance to Ampicillin).
Lab 6A: Separating the RFP Gene with Column Chromatography
After incubating the RFP gene, we used a chromatography column in order to separate the RFP from everything else. We did this by using a column with hydrophilic beads: this effectively collected the RFP in the resin bed. Then we eluted the RFP and knocked it off those beads by using a buffer.
Results:
Lab 2A & 4A: Verification of Plasmid by Restriction Digest and Electrophoresis Pre-lab Questions:
Post-lab Questions:
1. Plasmid Vector
3. They would keep the gene because it protects them from the antibiotic so that it doesn't kill them. It is affecting medicine because we need stronger and stronger antibodies to kill them.
4. All genes have a central dogma (DNA- mRNA- Protein), so they can be expressed in different organisms.
5. Put half a colony in an ampicillin petri dish and the other in a kanamycin petri dish. The ampicillin dish will be left with ampicillin- resistant bacteria and the other dish will only have kanamycin- resistant bacteria.
Post- Lab Questions:
1. It is important to verify that we have the right recombinant plasmid because we could make measuring mistakes, our materials could be faulty, or make mistakes during the procedure.
2. Our R+ and R- columns are perfect, but our loading dye column did not show at all.
3. We don't have any unexpected bands but we have an unexpected blank space.
4. The above photograph shows that we are using the correct recombinant plasmid because the R+ has two correctly placed fragments.
5. Two different bants prove multiple plasmid configurations.
6. It was completely digested because there are only two fragments in the R+ lane.
7. In the R+ lane, we expect to see a band around 807 bp as well as a band at around 4,495 bp. We were able to locate these two genes as evident in our picture.
8. The bands for the linear fragments have trailing edges instead of the non-trailing edges of the lanes that have plasmids.
Lab 5a
Pre-Lab Questions:
1. They do that because they need to separate the the two kinds of genes.
2. When they don't have arabinose the gene won't be expressed, so there won't be a red glow.
3. I predict that the LB plate will have non-glowing growth on both sides. I predict that the LB/Amp plate will have non-glowing growth on the P+ side. For the LB/Amp/Ara plate, I predict a glowing red colony.
Post-Lab Questions:
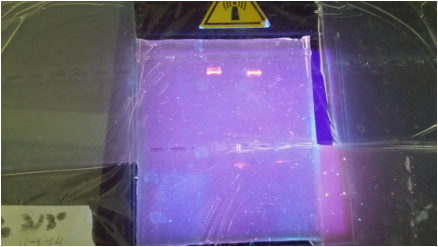
1. Most of our results matched my prediction but the LB/Amp/Ara plate wasn't glowing red like it was supposed to. This happened because the company shipped us bad materials so this happened to everyone, not just us.
2. There were no red colonies on the plate.
3. The red colonies would have only appeared on the araganose because it allows the red protein to be expressed.
4.The more copies there are, the more products there are.
5. The central dogma (DNA- RNA- Protein) ends with a protein. The RFP protein is expressed in the form of the red glow as a trait.
6. All genes have the same central dogma.
Lab 6a:
Pre-Lab Question:
1. Proteins are unfolded in the highly salt concentrated buffer. The proteins that don't flow out the column are refolded when lower salt concentrations are added, so they leave the column.
Post-Lab Questions:
1. It determines the promoter regions of the given protein. These promoter regions are what give each protein their different functions.
2. The sequence determines how it will fold in a protein
3. The RFP-containing elute is brighter than the cell lysate because the elute contains the most RFP while the cell lysate contained all the cell proteins.
4. The red fluorescent protein sticks to the resin column when unfolded
5. To increase the purity of the red fluorescent protein sample, we could use more wash buffers and be more careful about collection.
- We cut a plasmid, extracting the RFP-Ara gene, and ran it through a gel. There, we saw that the size of the molecule was accurate -- it corresponded with the DNA ladder.
Lab 2A & 4A: Verification of Plasmid by Restriction Digest and Electrophoresis
- We cut a plasmid, extracting the RFP-Ara gene, and ran it through a gel. There, we saw that the size of the molecule was accurate -- it corresponded with the DNA ladder.
Lab 5A: Transformation of Bacteria with Recombinant Plasmid
- We incubated three plates of bacteria in Luria broth:
Plate 1:
We applied the Amp-R plasmid and ampicillin - this effectively killed off all of the plasmids that had not correctly acquired the desired gene of interest. This plate then had a culture of bacteria with the plasmid.
Plate 2:
We applied the Amp-R plasmid but no ampicillin - because of this, the bacteria grew abundantly and without any form of selection. None died off at all, unlike Plate 1.
Plate 3:
We applied the Amp-R plasmid, ampicillin, and arabinose - this killed off any bacteria that did not uptake the gene, and also expressed the red fluorescent protein.
Lab 6A: Separating the RFP Gene with Gene Chromatography
We were able to separate the RFP gene through chromatography, using first the hydrophilic beads to attract the protein to the beads, and then a buffer to knock it off into a separate test tube.
Reflection: During all of these procedures, I believe my group could have managed to split tasks among ourselves more efficiently, we could also not talk to other groups, and we should not skip any instructions. We all managed our time very wisely, we all worked together well, and we all finished our tasks efficiently.
Amp: resistant to ampicillin, an antibiotic
- acts as selection marker for recombinant bacteria
Ara-C: binds to the promoter of the RFP gene
- responsible for gene expression of RFP
RFP: red fluorescent protein, the desired trait that the plasmid uptakes
Materials & Procedure:
Lab 2A - materials and procedure can be found in Amgen lab manual 2a
Lab 4A - materials and procedure can be found in Amgen lab manual 4a
Lab 6A - materials and procedure can be found in Amgen lab manual 6a
Lab 4A: Verification of Plasmid Digest by Electrophoresis
To ensure that we had actually cut the plasmid correctly, we used the process of electrophoresis. This means that we ran the plasmid in a gel alongside a DNA ladder. A DNA ladder has different-sized molecules already programmed into it, so after being run, it provides a "ladder" of bands that can be corresponded with the other lanes in order to decipher their molecule sizes. Because we already knew the size of the RFP gene and the plasmid, we were able to say if the digest had gone smoothly.
Experimental Overview:
Lab 2A: Verification of Plasmid by Restriction Digest
In this part of the lab, we cut a plasmid (a circular piece of DNA) with BamH1 and HindIII. In doing so, we were able to extract the segment of the RFP-Ara gene.
Lab 4A: Verification of Plasmid Digest by Electrophoresis
To ensure that we had actually cut the plasmid correctly, we used the process of electrophoresis. This means that we ran the plasmid in a gel alongside a DNA ladder. A DNA ladder has different-sized molecules already programmed into it, so after being run, it provides a "ladder" of bands that can be corresponded with the other lanes in order to decipher their molecule sizes. Because we already knew the size of the RFP gene and the plasmid, we were able to say if the digest had gone smoothly.
Lab 5A: Transformation of Bacteria with Recombinant Plasmid
The heart of the RFP lab was in this section, where we transformed the bacteria into a recombinant (man-made) plasmid. We used restriction enzymes to cut the plasmid and ligase to paste the gene of interest. We then used a selective marker (Amp-R, resistance to Ampicillin).
Lab 6A: Separating the RFP Gene with Column Chromatography
After incubating the RFP gene, we used a chromatography column in order to separate the RFP from everything else. We did this by using a column with hydrophilic beads: this effectively collected the RFP in the resin bed. Then we eluted the RFP and knocked it off those beads by using a buffer.
Results:
Lab 2A & 4A: Verification of Plasmid by Restriction Digest and Electrophoresis Pre-lab Questions:
- The fragments that are produced are the RFP pBAD and Ara-C fragment with ori and Amp-R. The nucleotide sequence length of the RFP fragment is 807 BP and the Ara-C fragment is 4495 BP.
- The RFP gene and the Ara-C (which binds to the promoter gene) are needed.
- It is important because it determines which bacteria will continue to grow and which dies to separate the colonies.
Post-lab Questions:
1. Plasmid Vector
- Ori= Origin of replication
- RFP and PBad= Genes of interest
- Amp-R= Selective Marker
- Ara-C= Binds to the promoter region which leads to transcription
3. They would keep the gene because it protects them from the antibiotic so that it doesn't kill them. It is affecting medicine because we need stronger and stronger antibodies to kill them.
4. All genes have a central dogma (DNA- mRNA- Protein), so they can be expressed in different organisms.
5. Put half a colony in an ampicillin petri dish and the other in a kanamycin petri dish. The ampicillin dish will be left with ampicillin- resistant bacteria and the other dish will only have kanamycin- resistant bacteria.
Post- Lab Questions:
1. It is important to verify that we have the right recombinant plasmid because we could make measuring mistakes, our materials could be faulty, or make mistakes during the procedure.
2. Our R+ and R- columns are perfect, but our loading dye column did not show at all.
3. We don't have any unexpected bands but we have an unexpected blank space.
4. The above photograph shows that we are using the correct recombinant plasmid because the R+ has two correctly placed fragments.
5. Two different bants prove multiple plasmid configurations.
6. It was completely digested because there are only two fragments in the R+ lane.
7. In the R+ lane, we expect to see a band around 807 bp as well as a band at around 4,495 bp. We were able to locate these two genes as evident in our picture.
8. The bands for the linear fragments have trailing edges instead of the non-trailing edges of the lanes that have plasmids.
Lab 5a
Pre-Lab Questions:
1. They do that because they need to separate the the two kinds of genes.
2. When they don't have arabinose the gene won't be expressed, so there won't be a red glow.
3. I predict that the LB plate will have non-glowing growth on both sides. I predict that the LB/Amp plate will have non-glowing growth on the P+ side. For the LB/Amp/Ara plate, I predict a glowing red colony.
Post-Lab Questions:
1. Most of our results matched my prediction but the LB/Amp/Ara plate wasn't glowing red like it was supposed to. This happened because the company shipped us bad materials so this happened to everyone, not just us.
2. There were no red colonies on the plate.
3. The red colonies would have only appeared on the araganose because it allows the red protein to be expressed.
4.The more copies there are, the more products there are.
5. The central dogma (DNA- RNA- Protein) ends with a protein. The RFP protein is expressed in the form of the red glow as a trait.
6. All genes have the same central dogma.
Lab 6a:
Pre-Lab Question:
1. Proteins are unfolded in the highly salt concentrated buffer. The proteins that don't flow out the column are refolded when lower salt concentrations are added, so they leave the column.
Post-Lab Questions:
1. It determines the promoter regions of the given protein. These promoter regions are what give each protein their different functions.
2. The sequence determines how it will fold in a protein
3. The RFP-containing elute is brighter than the cell lysate because the elute contains the most RFP while the cell lysate contained all the cell proteins.
4. The red fluorescent protein sticks to the resin column when unfolded
5. To increase the purity of the red fluorescent protein sample, we could use more wash buffers and be more careful about collection.
- We cut a plasmid, extracting the RFP-Ara gene, and ran it through a gel. There, we saw that the size of the molecule was accurate -- it corresponded with the DNA ladder.
Lab 2A & 4A: Verification of Plasmid by Restriction Digest and Electrophoresis
- We cut a plasmid, extracting the RFP-Ara gene, and ran it through a gel. There, we saw that the size of the molecule was accurate -- it corresponded with the DNA ladder.
Lab 5A: Transformation of Bacteria with Recombinant Plasmid
- We incubated three plates of bacteria in Luria broth:
Plate 1:
We applied the Amp-R plasmid and ampicillin - this effectively killed off all of the plasmids that had not correctly acquired the desired gene of interest. This plate then had a culture of bacteria with the plasmid.
Plate 2:
We applied the Amp-R plasmid but no ampicillin - because of this, the bacteria grew abundantly and without any form of selection. None died off at all, unlike Plate 1.
Plate 3:
We applied the Amp-R plasmid, ampicillin, and arabinose - this killed off any bacteria that did not uptake the gene, and also expressed the red fluorescent protein.
Lab 6A: Separating the RFP Gene with Gene Chromatography
We were able to separate the RFP gene through chromatography, using first the hydrophilic beads to attract the protein to the beads, and then a buffer to knock it off into a separate test tube.
Reflection: During all of these procedures, I believe my group could have managed to split tasks among ourselves more efficiently, we could also not talk to other groups, and we should not skip any instructions. We all managed our time very wisely, we all worked together well, and we all finished our tasks efficiently.
|
|
